Dec 29, 2013

Angel necklace


Hello! It's time for another DIY post, finally.
Today I would like to share a simple angel necklace that I made as a Christmas present for my friend. I think something like this would make a perfect daughter gift as well and, hopefully, one day I'll make another one for my daughter.


Here's what you need for this project:

Angel pendant
Chain
Eye pins
Some fake pearls
Clasp
Ribbon
Pliers


Step 1: Thread 3 pearls on the eye pin. Cut off the excess and make a loop at the end. Repeat the process one more time.


Step 2: Attach the pearls to the chain.


Step 3: Attach the pendant to the chain.


Step 4: Cut the chain to the desired length.
Step 5: Attach the clasp.


Step 6: Add the ribbon.


Step 7: Wear your guardian angel around your neck or give it to someone special :)


Dec 27, 2013

Capturing December (part 3)


Merry Christmas everyone!


Dec, 16th: "Green"


Dec, 17th: "Words"


Dec, 18th: "Night time"


* floating lantern in the distance


Dec, 19th: "Bright"


Dec, 20th: "Sky view"


* from the office


Dec, 21st: "Family"


Dec, 22nd: "Tree topper"


Dec, 23rd: "Presents"


Dec, 24th: "Favorite part of Christmas Eve"


Dec, 25th: "Morning"


Dec, 26th: "Tradition"


* no, not the cakes, but half of them eaten by the dog...happens every holiday :/


But look at this innocent face... 


...who could be mad at her?    


Dec 23, 2013

Capturing December (part 2)


I can't believe Christmas is on Wednesday. The time has really flown by and, to be honest, I don't feel like it's Christmas at all. It has been really crazy at work for the past two weeks and for the first time in my life I will have to work on Dec 24th which feels so wrong. Also, it seems there won't be any snow this Christmas...again. However, there are a few things that put me in the Christmas spirit - outside ornaments and lights, Christmas songs on the radio and my new Christmas earrings :)

How do you get into the spirit of Christmas?


Dec, 7th: "Joyous"


*Found this little guy at work. St. Nick brought it ;)


Dec, 8th: "Ornaments"


#Door wreath


Dec, 9th: "Something I'm reading"


* "The history of love"


Dec, 10th: "Wrapping paper"


Dec, 11th: "Christmas tree"


Dec, 12th: "Favorite holiday song"


*Just one of the many...but definitely a favorite holiday album.


Dec, 13th: "Outside Christmas lights"


* Zagreb, the main square


Dec, 14th: "Candy cane"


#Christmas earrings


Dec, 15th: "Scarf"


*my mom made it and it's over 2 meters long


Dec 8, 2013

Hello December!


Time really flies, doesn't it... I can't believe it's already December! I mean, where did the rest of my year go? Don't get me wrong, I love this time of the year – lights, Christmas trees, joy, hot chocolate, ornaments, Christmas songs and movies, magic, snow (hopefully)...what's not to love about it. But, each year, I feel like the time has just flown by me and I haven't done anything important during the past year. Usually I feel really bummed about it, but this year I'm really looking forward to the new year. You see, a couple of days ago, I concluded that this has been one of the worst years in my life, if not THE worst. So, I can't wait to put everything that happened in the past tense and start all over again – I mean, what's the new year if not the opportunity for the new beginning, right?

Well, anyway, it's been over a month since my last post (shame on me!) which is not even near my initial plans I had for this blog. In my defense, two previous months have been a bit crazy and I had some health issues that I had to solve, so I wasn't even thinking about this blog. But I'm back, and I definitely plan to address this little blog more seriously in the next year.

Today's post won't be exactly a DIY. Instead I would like to start a series of posts through December with the purpose of celebrating the most magical time of the year. Initially, I planed to make an Advent calendar for myself, with cute presents and little tasks through December, but I wasn't able to finish it in time. However, I found a very cute December challenge on Pinterest that can replace an Advent calendar in a certain way. It's photo-a-day challenge with the aim of capturing December and all its magic. So...without further ado, here are my photos from day 1 to 6.


Dec, 1st: "My view today"


Dec, 2nd: "Favorite holiday movie"


Dec, 3rd: "Red"


Dec, 4th: "Today's temperature"


Dec, 5th: "Shopping"


Dec, 6th: "Stockings"...well, "Boots for St. Nicholas Day", actually...


And if anyone reads this (anyone?) and would like to join me in this challenge, here is the list of all tasks.


As you can notice, I've cheated a little bit – I decided to rearrange a few dates according to my traditions and/or mood. :) Guilty!


Nov 2, 2013

DIY "Cracked" Vases

What do you do with empty jars? Do you throw them away or do you pile them? I realized recently that I have a lot of empty jars of all sizes that are just lying around the apartment. So, I decided to give them a new life with a few recycling projects. 
Let's start with these vases, shall we?


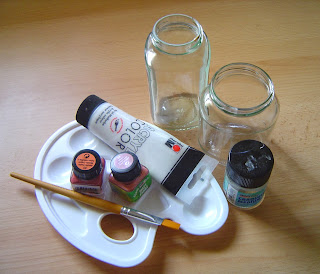
What you need:

Empty jars
Crackle lacquer
Paint
Napkins and/or rice paper (optional)
Mod Podge
Brushes


Step 1: Clean jars and remove all labels.
Step 2: Apply an even coat of crackle lacquer in one direction only. Let it dry until it stops being sticky.


Step 3: Apply color in the same direction. You will notice how cracks appear as color dries. Thinner coat of color should produce a finer (smaller) cracks, and thicker crackle can be produced by applying a heavier coat of color.
Warning: Do not apply color twice over the same spot because it will make the color peel and you will get a big ugly hole!


Step 4: Let it dry completely.
Step 5: You can leave the vases as they are or you can additionally decorate them. I cut some motives from napkins and rice paper and glued them on the jars with some Mod Podge.
Step 6: Apply a coat of Mod Podge over the whole jar to seal and protect your work.


And you are done! Now you just need some flowers to put in your new beautiful vases.